Python Client
The AMBF Python Client
This simplest way to interact with simulated bodies, robots/multi-bodies, kinematic and visual objects in the AMBF simulator is by using the high-speed Asynchronous Communication that is implemented via ROS-topics in the AMBF Framework Library. One can use either using C++ or Python for creating applications for this purpose. For ease of interaction we provide a convenient Python Client which can be used as follows:
For full feature set of the AMBF Simulator, it is advised that you install it on Linux (Ubuntu) 16,17 or 18. Other variants might be supported but have not yet been tested.
Start the AMBF Simulator with your choice of Multi-Body config file that can be directly set in the ambf_models/launch.yaml file.
In your python application
# Import the Client from ambf_comm package
from ambf_client import Client
import time

# Create a instance of the client
_client = Client()

# Connect the client which in turn creates callable objects from ROS topics
# and initiates a shared pool of threads for bidrectional communication
_client.connect()

# You can print the names of objects found
print(_client.get_obj_names())

# Lets say from the list of printed names, we want to get the
# handle to an object names "Torus"
torus_obj = _client.get_obj_handle('Torus')

# Now you can use the torus_obj to set and get its position, rotation,
# Pose etc. If the object has joints, you can also control them
# in either position control mode or open loop effort mode. You can even mix and
# match the joints commands
torus_obj.set_pos(0, 0, 0) # Set the XYZ Pos in obj's World frame
torus_obj.set_rpy(1.5, 0.7, .0) # Set the Fixed RPY in World frame
time.sleep(5) # Sleep for a while to see the effect of the command before moving on

# Other methods to control the obj position include
# torus_obj.set_pose(pose_cmd) # Where pose_cmd is of type Geometry_msgs/Pose
# torus_obj.set_rot(quaterion) # Where quaternion is a list in the order of [qx, qy, qz, qw]
# Finally all the position control params can be controlled in a single method call
# torus_obj.pose_command(px, py, pz, roll, pitch, yaw, *jnt_cmds)

# We can just as easily get the pose information of the obj
cur_pos = torus_obj.get_pos() # xyx position in World frame
cur_rot = torus_obj.get_rot() # Quaternion in World frame
cur_rpy = torus_obj.get_rpy() # Fixed RPY in World frame

# Similarly you can directly control the wrench acting on the obj by
torus_obj.set_force(5, -5, 10) # Set the force in the World frame
torus_obj.set_torque(0, 0, 0.8) # Set the torque in the World frame
time.sleep(5) # Sleep for a while to see the effect of the command before moving on

# Similarly you can directly control the wrench acting on the obj by
# The key difference is that it's the user's job to update the forces
# and torques in a loop otherwise the wrench in cleared after an internal
# watchdog timer expires if a new command is not set. This is for safety
# reasons where a user shouldn't set a wrench and then forget about it.
for i in range(0, 5000):
    torus_obj.set_force(5, -5, 10) # Set the force in the World frame
    torus_obj.set_torque(0, 0, 0.8) # Set the torque in the World frame
    time.sleep(0.001) # Sleep for a while to see the effect of the command before moving on

# We can get the number of children and joints connected to this body as
num_joints = torus_obj.get_num_joints() # Get the number of joints of this object
children_names = torus_obj.get_children_names() # Get a list of children names belonging to this obj

print(num_joints)
print(children_names)

# If the obj has some joints, we can control them as follows
if num_joints > 1:
    torus_obj.set_joint_pos(0, 0.5) # The the joints at idx 0 to 0.5 Radian
    torus_obj.set_joint_effort(1, 5) # Set the effort of joint at idx 1 to 5 Nm
    time.sleep(2) # Sleep for a while to see the effect of the command before moving on

# Lastly to cleanup
_client.clean_up()
Controlling dVRK Manipulators
This is an example of how to begin using the AMBF Simulator. Let’s start by going to the launch file in your local cloned repository. This launch file is located in ambf/ambf_models/descriptions/launch.
# This is the base file for Coordination Application
world config: ./world/world.yaml
color config: ./color/colors.yaml
input devices config: ./input_devices/input_devices.yaml
multibody configs:
  1. "./multi-bodies/robots/blender-toy-car.yaml" #0
  2. "./multi-bodies/robots/blender-toy-car2.yaml" #1
  3. "./multi-bodies/robots/blender-neuro-robot.yaml" #2
  4. "./multi-bodies/robots/blender-raven2.yaml" #3
  5. "./multi-bodies/robots/blender-mtm.yaml" #4
  6. "./multi-bodies/robots/blender-psm.yaml" #5
  7. "./multi-bodies/robots/blender-ecm.yaml" #6
  8. "./multi-bodies/robots/blender-suj.yaml" #7
  9. "./multi-bodies/robots/blender-kuka.yaml" #8
  10. "./multi-bodies/robots/blender-pr2.yaml" #9
  11. "./multi-bodies/puzzles/parallel_structure.yaml" #10
  12. "./multi-bodies/puzzles/puzzle1.yaml" #11
  13. "./multi-bodies/puzzles/puzzle2.yaml" #12
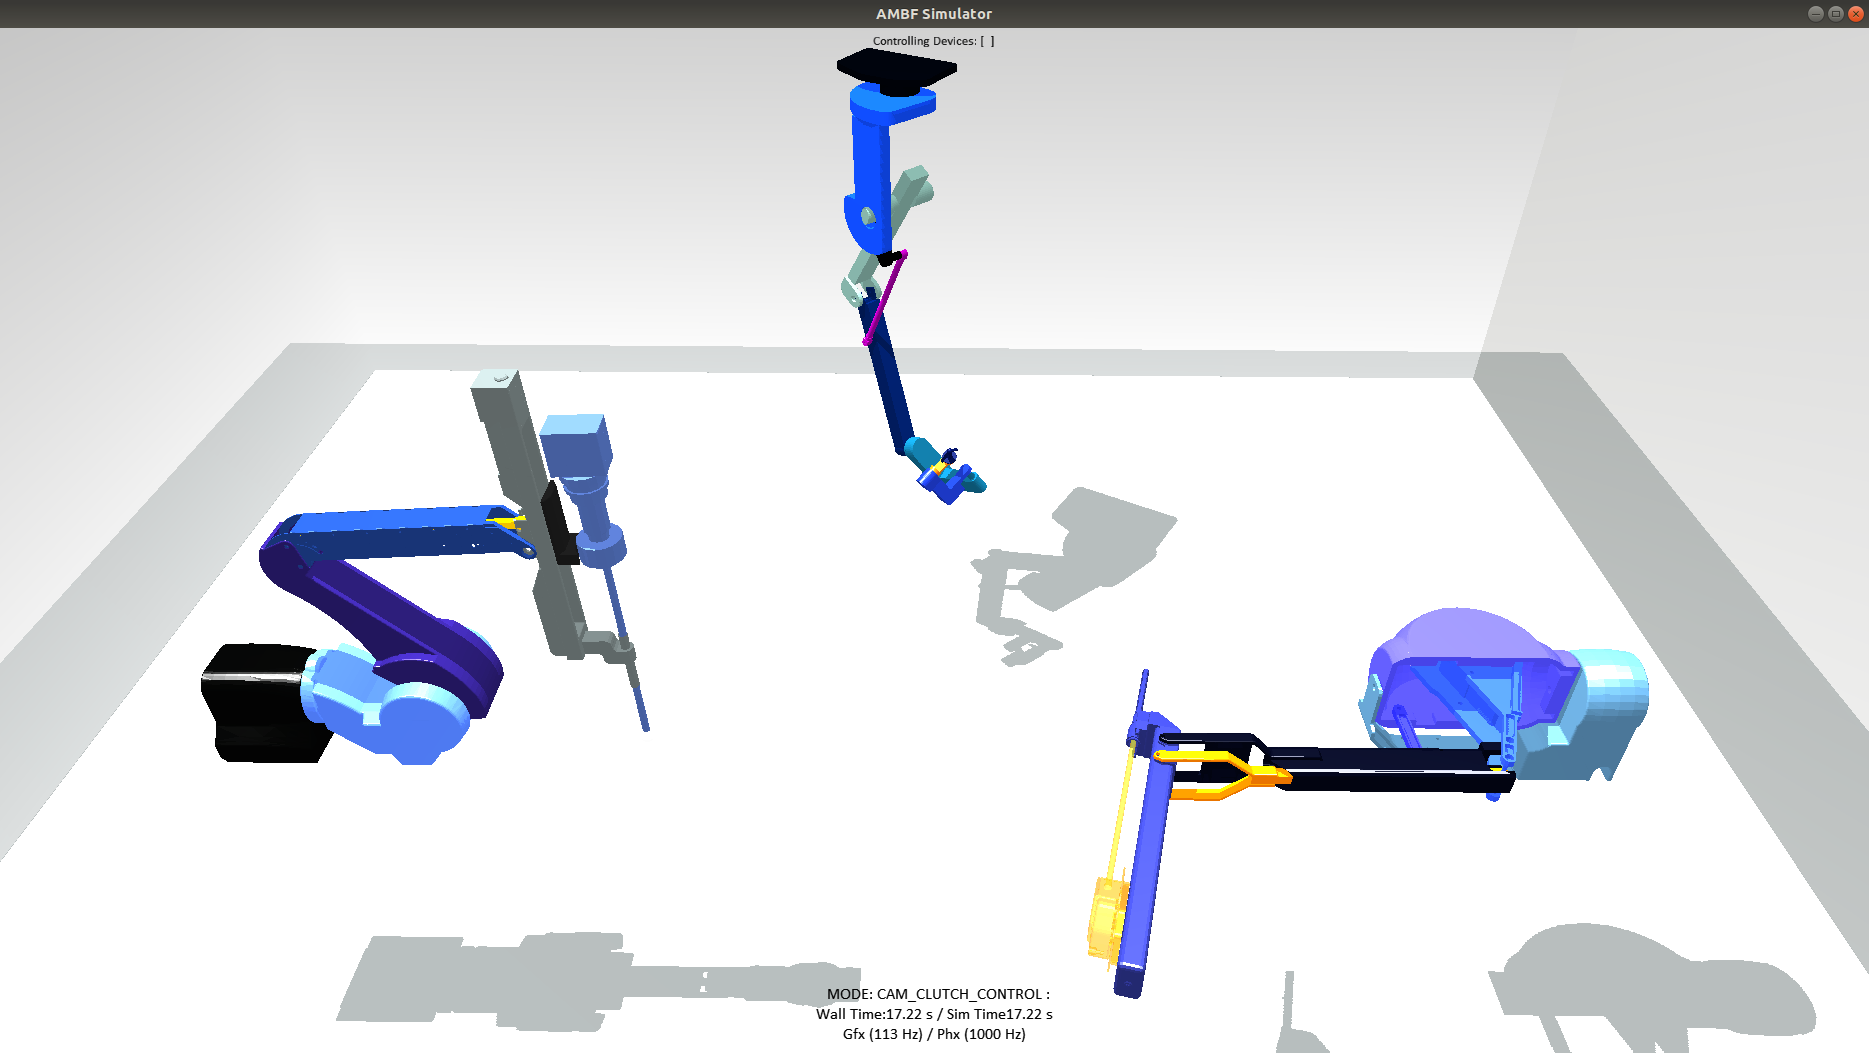
We can see that the dVRK Manipulators are defined at Index 4 (MTM), 5 (PSM) and 6 (ECM).
Now let’s launch the simulator as follows:
cd ~/ambf/bin/<os>
./ambf_simulator -l 4,5,6
Do you see the dVRK ECM, PSM, and MTM as shown below? If yes, great, otherwise close the simulator and double check to see that the indexes match the dVRK manipulators in your ambf/ambf_models/descriptions/launch file.
Controlling via RQT GUI
As a demo, some premade RQT files have been placed in ambf/ambf_utilities/rqt_perspectives to get you up and running. In a terminal, launch rqt_gui using:
rosrun rqt_gui rqt_gui
Now in the top menu of rqt_gui, navigate to Perspectives -> Import
From the file browser, head to ambf/ambf_utilities/rqt_perspectives and select the ecm-psm-mtm-rqt-gui.perspective file. Note that AMBF could be installed in a non-default path in your system, so make sure to go to the correct path.
Great. You should see some topics already visible for selection in the rqt_gui. Select the checkbox for any topics to see the effect on the corresponding dVRK manipulator. Uncheck the checkbox to reset the commands. You can expand the topics in the RQT Gui to see what kind of command are we issuing to the manipulators.
Controlling via AMBF Python Client
Now let’s use the provided python client for finer control of the manipulators. you can use the following python code snippet:
# Import the Client from ambf_client package
from ambf_client import Client
import time

# Create a instance of the client
_client = Client()

# Connect the client which in turn creates callable objects from ROS topics
# and initiates a shared pool of threads for bi-directional communication
_client.connect()

print('\n\n----')
raw_input("We can see what objects the client has found. Press Enter to continue...")
# You can print the names of objects found. We should see all the links found
print(_client.get_obj_names())

# Lets get a handle to PSM and ECM, as we can see in the printed
# object names, 'ecm/baselink' and 'psm/baselink' should exist
ecm_handle = _client.get_obj_handle('ecm/baselink')
psm_handle = _client.get_obj_handle('psm/baselink')

# Similarly we can get a handle to any link lower in the hierarchy rather
# than the root link. Let's get a handle to MTMs wrist platform link
mtm_wrist_handle = _client.get_obj_handle('mtm/WristYaw')

# Let's sleep for a very brief moment to give the internal callbacks
# to sync up new data from the running simulator
time.sleep(0.2)

print('\n\n----')
raw_input("Let's Get Some Pose Info. Press Enter to continue...")
# Not we can print the pos and rotation of object in the World Frame
print('ECM Base Pos:')
print(ecm_handle.get_pos())

print(' ')
print('PSM Base Rotation as Quaternion:')
print(psm_handle.get_rot())

print(' ')
print('MTM Wrist Fixed Rotation:')
print(mtm_wrist_handle.get_rpy())

print('\n\n----')
raw_input("Let's get Joints and Children Info. Press Enter to continue...")
# We can get the number of children and joints connected to each object as
ecm_num_joints = ecm_handle.get_num_joints() # Get the number of joints of this object
psm_children_names = psm_handle.get_children_names() # Get a list of children names belonging to this obj
print('Number of Joints in ECM:')
print(ecm_num_joints)

print(' ')
print('Name of PSM\'s children:')
print(psm_children_names)

print('\n\n----')
raw_input("Control ECMs joint positions. Press Enter to continue...")
# Now let's control some joints
# The 1st joint, which the ECM Yaw
ecm_handle.set_joint_pos(0, 0)
# The 2nd joint, which is the ECM Pitch
ecm_handle.set_joint_pos(1, -0.2)
# The 3rd Kinematic or 7th Actual Joint, which is the Prismatic Insertion Joint
ecm_handle.set_joint_pos(6, 0.1)

print('\n\n----')
raw_input("Mixed Pos and Effort control of PSM\'s joints. Press Enter to continue...")
# For the PSM let's control some in position and some in effort mode
# The 1st joint, which the PSM Yaw
psm_handle.set_joint_effort(0, 0.5)
# The 3rd Kinematic joint, which is the PSM Insertion Joint
psm_handle.set_joint_pos(3, -0.2)

print('\n\n----')
raw_input("Set force on MTM's Wrist Yaw link for 5 secs. Press Enter to continue...")
# Let's directly control the forces and torques on the mtmWristYaw Link
# Notice that these are in the world frame. Another important thing to notice
# is that unlike position control, forces control requires a continuous update
# to meet a watchdog timing condition otherwise the forces are reset Null. This
# is purely for safety reasons to prevent unchecked forces in case of malfunctioning
# python client code
for i in range(0, 500):
    mtm_wrist_handle.set_force(0, 0, 10) # Set 10 N in the World Z axis
    time.sleep(0.01) # Run the loop for 10 seconds

print('\n\n----')
raw_input("Set wrench on MTM's Wrist Yaw link for 5 secs. Press Enter to continue...")
# Similarly we can individually apply the torque
for i in range(0, 500):
    mtm_wrist_handle.set_torque(0, 3, 0) # Set 10 Nm in the World Y axis
    time.sleep(0.01) # Run the loop for 10 seconds

print('\n\n----')
raw_input("Let's clean up. Press Enter to continue...")
# Lastly to cleanup
_client.clean_up()
Controlling a Toy Car with Suspension
This is an example of how to begin using the AMBF Simulator. Let’s start by going to the launch file in your local cloned repository. This launch file is located in ambf/ambf_models/descriptions/launch.
# This is the base file for Coordination Application
world config: ./world/world.yaml
color config: ./color/colors.yaml
input devices config: ./input_devices/input_devices.yaml
multibody configs:
  1. "./multi-bodies/robots/blender-toy-car.yaml" #0
  2. "./multi-bodies/robots/blender-toy-car2.yaml" #1
  3. "./multi-bodies/robots/blender-neuro-robot.yaml" #2
  4. "./multi-bodies/robots/blender-raven2.yaml" #3
  5. "./multi-bodies/robots/blender-mtm.yaml" #4
  6. "./multi-bodies/robots/blender-psm.yaml" #5
  7. "./multi-bodies/robots/blender-ecm.yaml" #6
  8. "./multi-bodies/robots/blender-suj.yaml" #7
  9. "./multi-bodies/robots/blender-kuka.yaml" #8
  10. "./multi-bodies/robots/blender-pr2.yaml" #9
  11. "./multi-bodies/puzzles/parallel_structure.yaml" #10
  12. "./multi-bodies/puzzles/puzzle1.yaml" #11
  13. "./multi-bodies/puzzles/puzzle2.yaml" #12
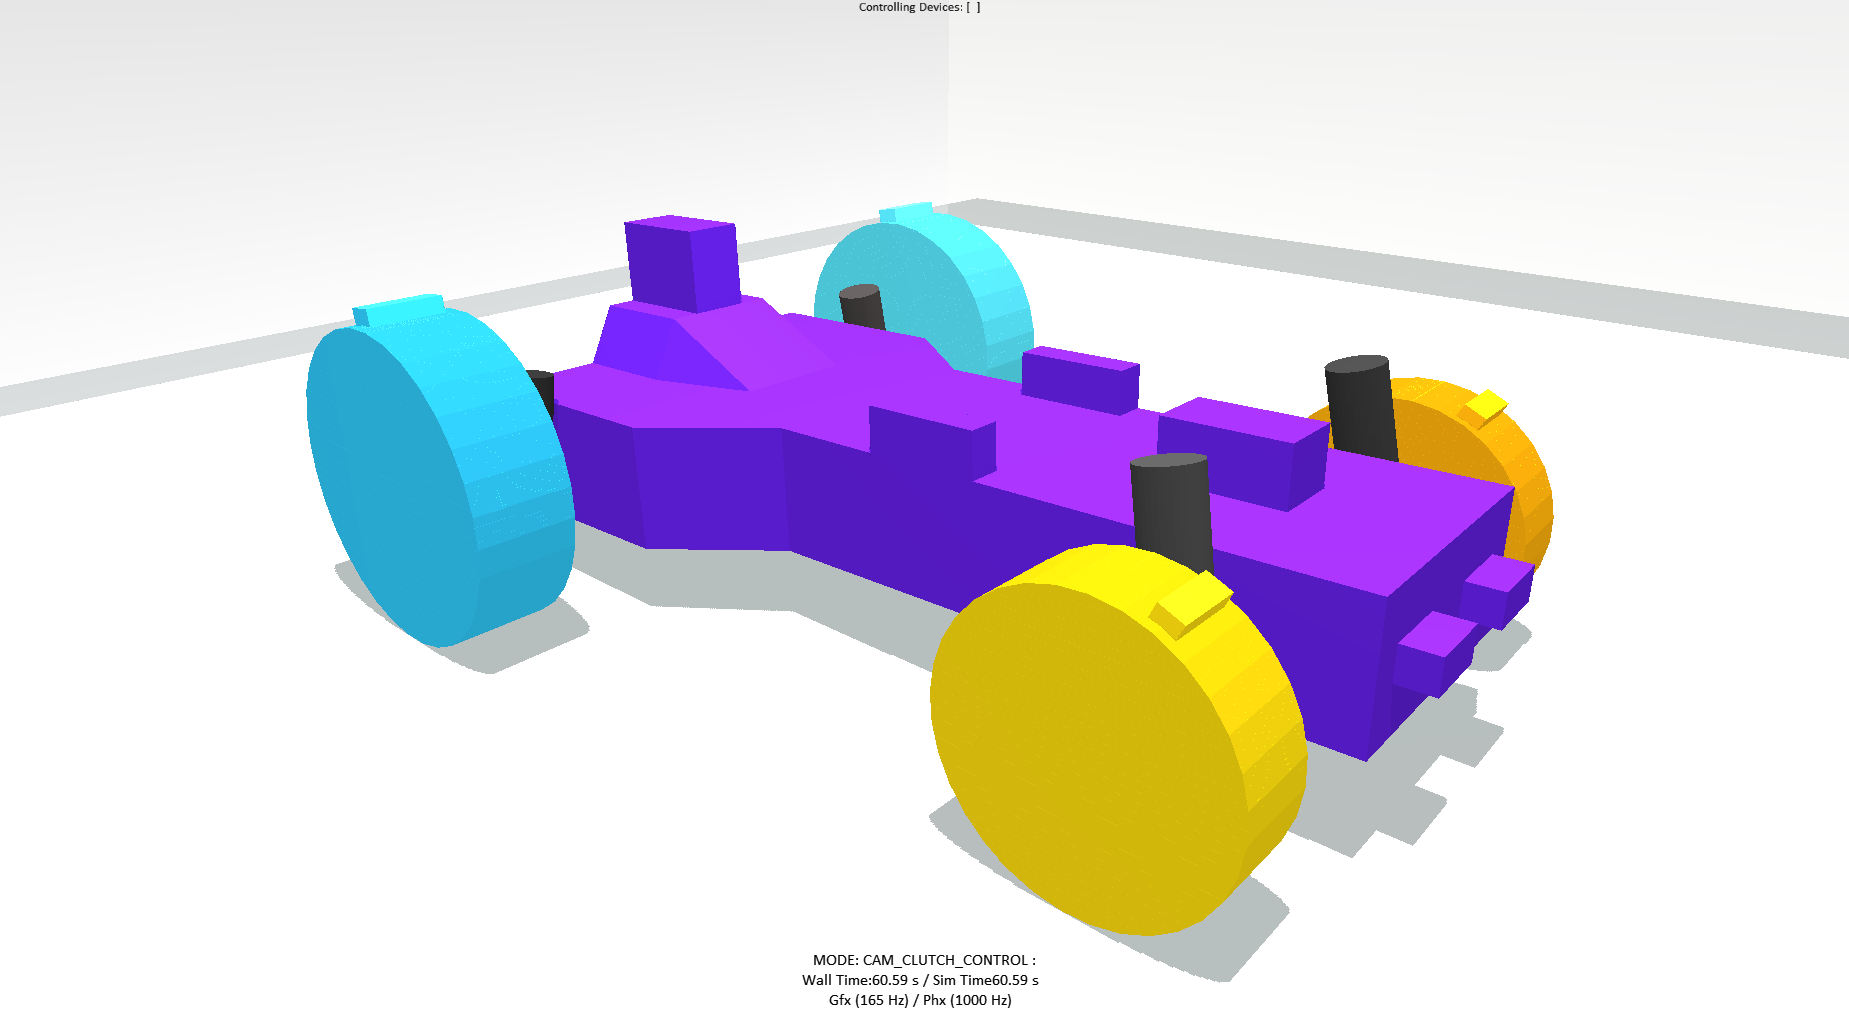
We can see that the Toy Car(s) are defined at Index 0 (Simple) and 1 (With Suspension).
Now let’s launch the simulator as follows:
cd ~/ambf/bin/<os>
./ambf_simulator -l 1
Do you see the toy-car as shown below? If yes, great, otherwise close the simulator and double check to see that the indexes match the toy-car in your ambf/ambf_models/descriptions/launch file.
Now we need one more modification. Open the ambf/ambf_models/descriptions/multi-bodies/robots/blender-toy-car2.yaml in your favorite text editor. We need to add some additional launch variables which would tell the simulator to publish children and joint names of non-root bodies. By default, the Simulator publishes the joint names and joint positions of root links and not the links that occur down the hierarchy. This can be easily changed in the AMBF description file of a Robot/Multibody.
Let’s scroll down to the definition of Body ShockFL
BODY ShockFL:
  name: ShockFL
  mesh: ShockFL.STL
  mass: 0.3
  collision margin: 0.001
  scale: 1.0
  location:
    orientation: {p: -1.772, r: 0.452, y: -0.444}
    position: {x: 0.126, y: -0.206, z: 0.035}
  inertial offset:
    orientation: {p: 0, r: 0, y: 0}
    position: {x: -0.0, y: -0.0, z: 0.0}
  friction: {rolling: 0.01, static: 0.5}
  damping: {angular: 0.1, linear: 0.04}
  restitution: 0
  collision groups: [0]
  color components:
    ambient: {level: 1.0}
    diffuse: {b: 0.1845, g: 0.1845, r: 0.1845}
    specular: {b: 1.0, g: 1.0, r: 1.0}
    transparency: 1.0
We need to add three lines anywhere inside the body definition. The three lines that we want to add are as follows:
publish children names: true
publish joint names: true
publish joint positions: true
Your resulting BODY ShockFL block should look like this:
BODY ShockFL:
  name: ShockFL
  mesh: ShockFL.STL
  mass: 0.3
  collision margin: 0.001
  scale: 1.0
  publish children names: true
  publish joint names: true
  publish joint positions: true
  location:
    orientation: {p: -1.772, r: 0.452, y: -0.444}
    position: {x: 0.126, y: -0.206, z: 0.035}
  inertial offset:
    orientation: {p: 0, r: 0, y: 0}
    position: {x: -0.0, y: -0.0, z: 0.0}
  friction: {rolling: 0.01, static: 0.5}
  damping: {angular: 0.1, linear: 0.04}
  restitution: 0
  collision groups: [0]
  color components:
    ambient: {level: 1.0}
    diffuse: {b: 0.1845, g: 0.1845, r: 0.1845}
    specular: {b: 1.0, g: 1.0, r: 1.0}
    transparency: 1.0
Let’s do the exact same thing in the BODY ShockFR block such that it should end up looking like this:
BODY ShockFR:
  name: ShockFR
  mesh: ShockFR.STL
  mass: 0.3
  collision margin: 0.001
  scale: 1.0
  publish children names: true
  publish joint names: true
  publish joint positions: true
  location:
    orientation: {p: -1.772, r: -0.452, y: 0.444}
    position: {x: 0.126, y: 0.185, z: 0.035}
  inertial offset:
    orientation: {p: 0, r: 0, y: 0}
    position: {x: -0.0, y: -0.0, z: 0.0}
  friction: {rolling: 0.01, static: 0.5}
  damping: {angular: 0.1, linear: 0.04}
  restitution: 0
  collision groups: [0]
  color components:
    ambient: {level: 1.0}
    diffuse: {b: 0.1473, g: 0.1473, r: 0.1473}
    specular: {b: 1.0, g: 1.0, r: 1.0}
    transparency: 1.0
Be mindful of the white spaces as YAML is similar to Python in picking whitespace and tabs.
Now let’s launch the simulator as described in launching the Simulator. Do you see a toy car as shown below? If yes, great, otherwise close the simulator and double check to see if you have any unintended whitespaces or extra tab spaces in the ambf/ambf_models/descriptions/launch file above. Correct these and relaunch the simulator
Controlling using the Python Client
Now let’s use the provided python client for finer control of the Toy Car. you can use the following python code snippet:
# Import the Client from ambf_client package
from ambf_client import Client
import time

# Create a instance of the client
_client = Client()

# Connect the client which in turn creates callable objects from ROS topics
# and initiates a shared pool of threads for bi-directional communication
_client.connect()

print('\n\n----')
raw_input("We can see what objects the client has found. Press Enter to continue...")
# You can print the names of objects found. We should see all the links found
print(_client.get_obj_names())

# Lets get a handle the chassis of the toy car
chassis_handle = _client.get_obj_handle('Chassis')

# Let's get a handle to the two front suspensions which have the wheels
# as their children
shock_fr_handle = _client.get_obj_handle('ShockFR')
shock_fl_handle = _client.get_obj_handle('ShockFL')

# Let's sleep for a very brief moment to give the internal callbacks
# to sync up new data from the running simulator
time.sleep(0.2)

print('\n\n----')
raw_input("Let's Get Some Pose Info. Press Enter to continue...")
# Not we can print the pos and rotation of object in the World Frame
print('Chassis Pos:')
print(chassis_handle.get_pos())
print('Chassis Rot:')
print(chassis_handle.get_rot())


print('\n\n----')
raw_input("Let's get Joints and Children Info. Press Enter to continue...")
# We can get the number of children and joints connected to each object as
chassis_num_joints = chassis_handle.get_num_joints() # Get the number of joints of this object
chassis_joint_names = chassis_handle.get_joint_names() # Get a list of children names belonging to this obj
chassis_children_names = chassis_handle.get_children_names() # Get a list of children names belonging to this obj
print('Number of Joints in Chassis:')
print(chassis_num_joints)

print(' ')
print('Joint names for Chassis:')
print(chassis_joint_names)

print(' ')
print('Name of Chassis\' children:')
print(chassis_children_names)

print('\n\n----')
raw_input("Control Wheel Angles. Press Enter to continue...")
# In this example, rather than controlling the joints from Chassis, lets control
# them from lower down the hierarchy. In this case, we shall use the FR Shock and FL
# Shock which parent the FR Wheel and FL Wheel respectively.

# Set the position of FL wheel
shock_fl_handle.set_joint_pos(0, 1.57)

# Set the Position of FR Wheel
shock_fr_handle.set_joint_pos(0, -1.57)

print('\n\n----')
raw_input("Control Wheel Torques. Press Enter to continue...")
# Now lets directly control the wheel torques.
shock_fl_handle.set_joint_effort(0, 0.6)
# Set some torque for FR Wheel
shock_fr_handle.set_joint_effort(0, 0.9)
# Lets sleep for a few seconds to see the effect
time.sleep(5)

shock_fl_handle.set_joint_effort(0, 0.0)
# Set some torque for FR Wheel
shock_fr_handle.set_joint_effort(0, 0.0)

print('\n\n----')
raw_input("Set force on Chassis for 5 secs. Press Enter to continue...")
# Let's directly control the forces and torques on the Chassis Link
# Notice that these are in the world frame. Another important thing to notice
# is that unlike position control, forces control requires a continuous update
# to meet a watchdog timing condition otherwise the forces are cleared. This
# is purely for safety reasons to prevent unchecked forces in case of malfunctioning
# python client code
for i in range(0, 500):
    chassis_handle.set_force(100, 0, 0)  # Set 100 N in the World Z axis
    time.sleep(0.01)  # Run the loop for 5 seconds

print('\n\n----')
raw_input("Set torque on Chassis for 2 secs. Press Enter to continue...")
# Similarly we can individually apply the torque
for i in range(0, 200):
    chassis_handle.set_torque(0, 0, 60)  # Set 100 Nm in the World Z axis
    time.sleep(0.01)  # Run the loop for 2 seconds

print('\n\n----')
raw_input("Set force on Chassis in Body Frame 5 secs. Press Enter to continue...")
# The above force and torques were in the World frame. In many instances we care
# about setting the wrench in body frame. This is just as convenient. Lets see how to
# do that.
#
# Make sure you have PyKDL installed
from PyKDL import Rotation, Vector

for i in range(0, 500):
    cur_rot = chassis_handle.get_rot()
    # Rotation of Chassis in World
    R_cINw = Rotation.Quaternion(cur_rot.x, cur_rot.y, cur_rot.z, cur_rot.w)
    fw = Vector(15, 0, 0) # Lets set a force along body's X axis
    fc = R_cINw * fw  # Converted force in World Frame that would act in Body Frame
    chassis_handle.set_force(fc.x(), fc.y(), fc.z())  # Set 100 N in the World Z axis
    time.sleep(0.01)  # Run the loop for 5 seconds

print('\n\n----')
raw_input("Let's clean up. Press Enter to continue...")
# Lastly to cleanup
_client.clean_up()